
A note before we start the guide. This is the second time that I’ve had to replace the same spring in the same controller. I decided to document it this time to hopefully help you out. With that said, I am NOT responsible if you break anything. Also, my broken spring will look slightly different because it is a replacement spring from a floppy disk.
I like the Playstation 3 (PS3) controller, but I’m sometimes aggressive with the triggers. As I mentioned, this is the second time I’ve had to replace a spring in this controller. You’ll know a spring is broken, because the trigger will just flop in and out instead of snapping to it’s normal, out position. You would think that finding a replacement spring would be difficult or expensive. Think again. A 3.5 inch floppy disk contains the perfect spring. This guide will walk you through how to replace a broken PS3 controller trigger spring with a floppy disk spring. The good thing is that this spring is more durable than the original PS3 controller trigger spring. Let’s get started.
What you need:
- Playstation 3 controller with a broken spring trigger that you want to fix
- Small Phillips screwdriver
- 3.5 Inch Floppy disk (or another spring for a Playstation 3 controller)
- wire cutter (or pliers with wire cutter)

First, make sure your Playstation 3 is turned off, and the switch in the back is turned off. We don’t want it to accidently turn on if you push the PS button on the controller. Then, remove the back of the controller. Use the Phillips screwdriver to remove the five screws noted in the picture below. Try not to strip the screw heads, but they will take some effort to remove. I like to keep the screws inside of the holes in the back of the controller so I do not lose them.

The back should snap off. It takes a little effort, but be careful with it.
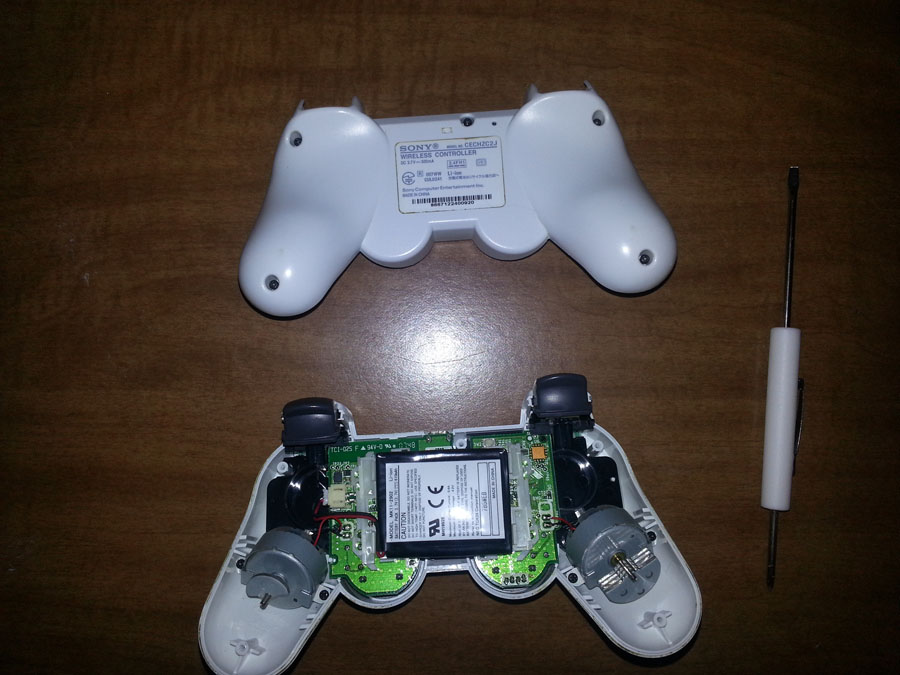
Welcome to the inside of the PS3 controller. Note that the battery just sits in the middle. Once the back of the controller is removed, a few pieces might come out/fall off. The back basically holds a lot of items together. The piece that holds the battery might fall out (the battery just hangs there by its wire). The pieces between the R1/L1 and R2/L2 buttons might come off (I’ll refer to these pieces as “H” pieces from now on), and the R1 and L1 buttons might fall off with it. That’s okay; I’ll help you put it back together after we are done. If they don’t get displaced, remove the “H” pieces and the R1/L1 buttons.
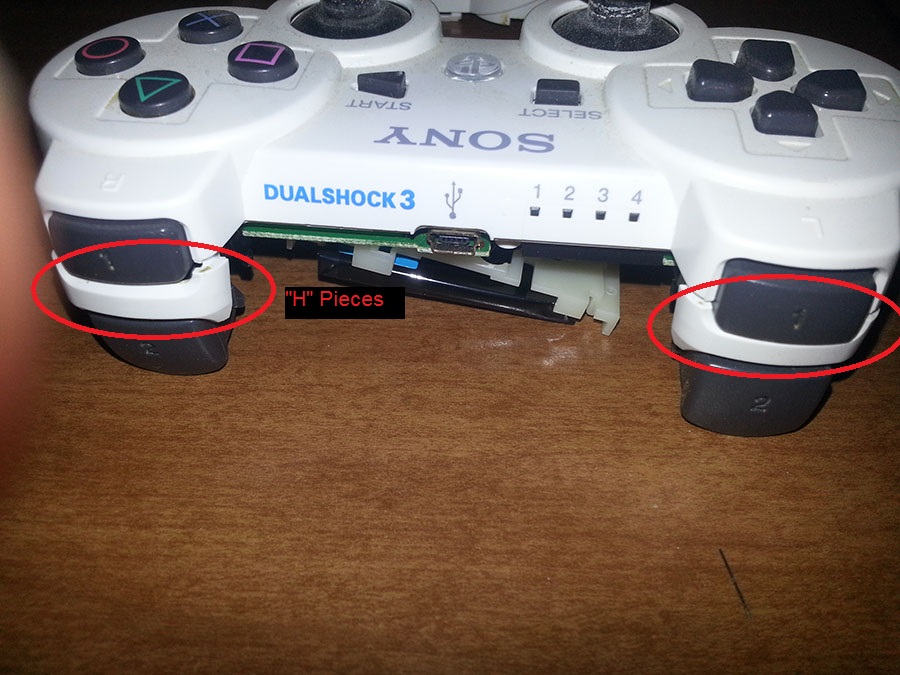


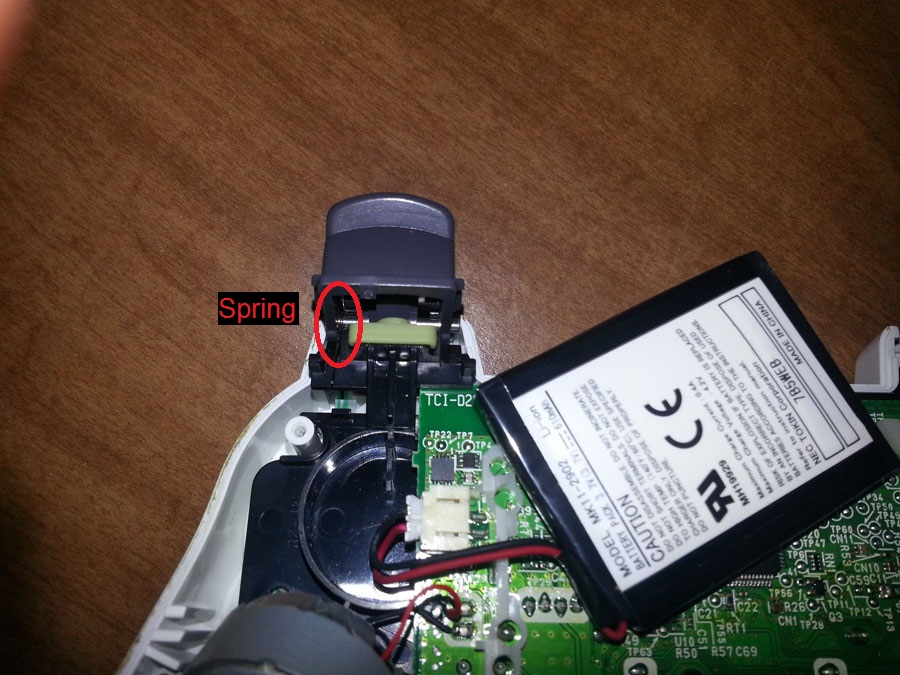
Let’s dig into the actually triggers, and see what’s up. Remove the bar pictured below. In my case it’s the R2 trigger. If you can’t remember which one for some reason, not broken triggers rebound smoothly when pressed, broken ones stay limp.
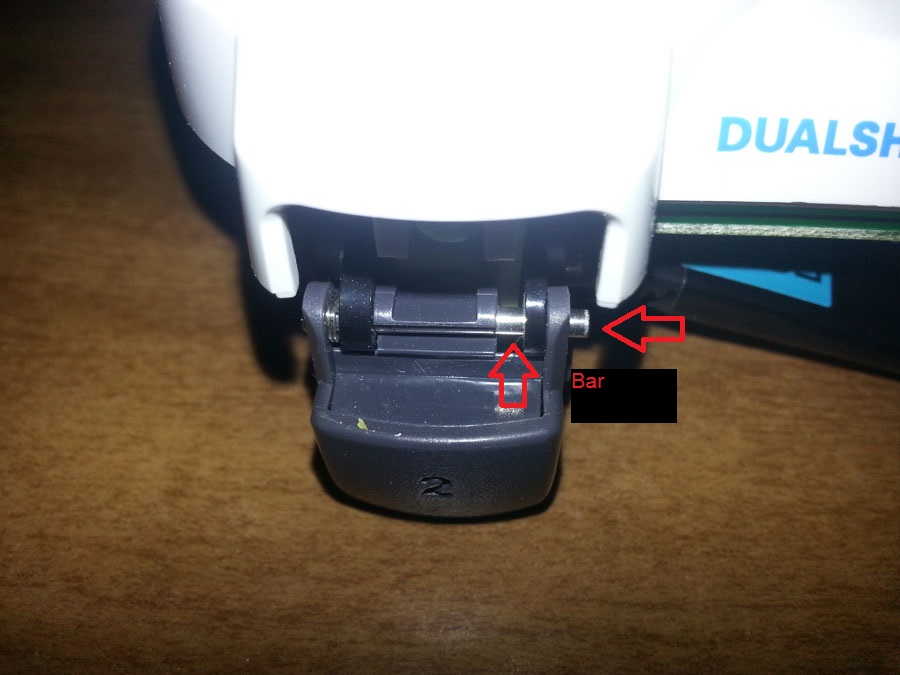
To remove the bar, slide it towards the outside of the controller. Like so:

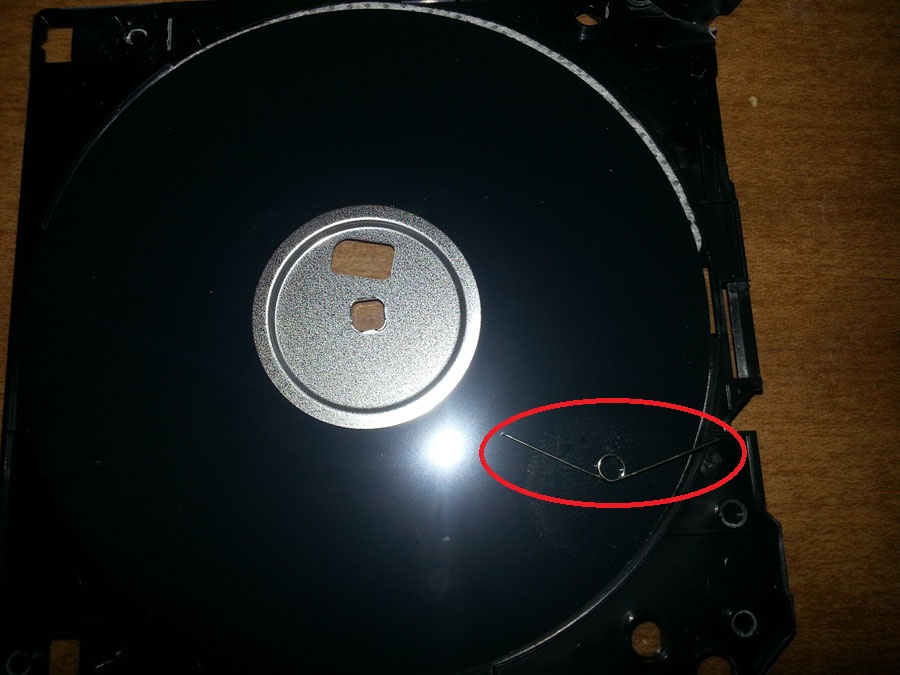
Slide it all the way out and the trigger should come off. The spring will also fall out with it, because the spring loops around this bar. Broken springs usually look like this:
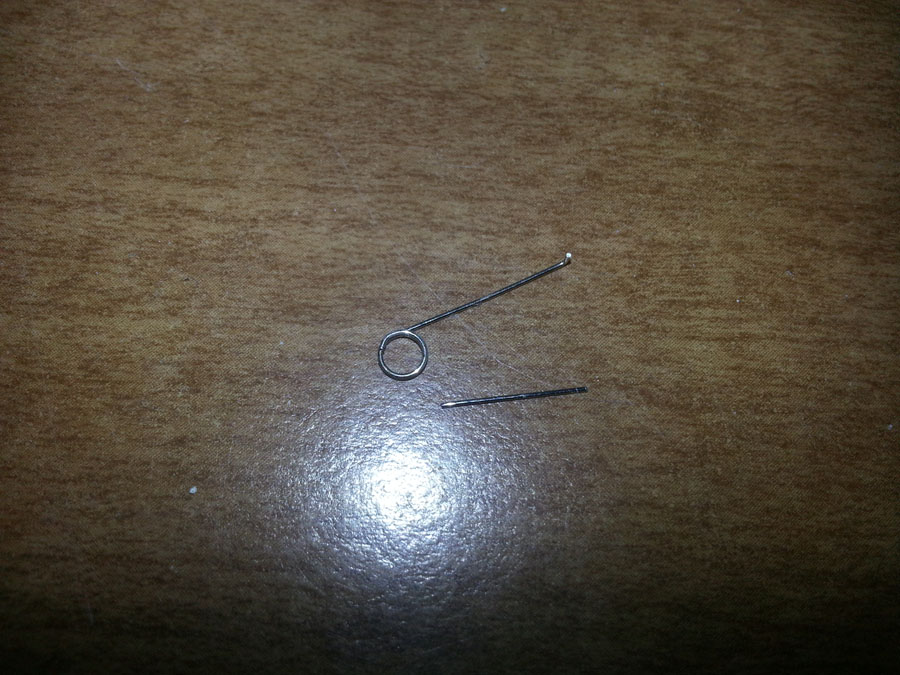
*note, the spring pictured is not a Playstation controller spring… I broke a Playstation trigger spring a few years ago, and replaced it with this spring. It should look similar though.
If yours doesn’t look broken, then put the controller back together… I’m not sure what your issue is. Skip ahead to the section where I reassemble the controller.
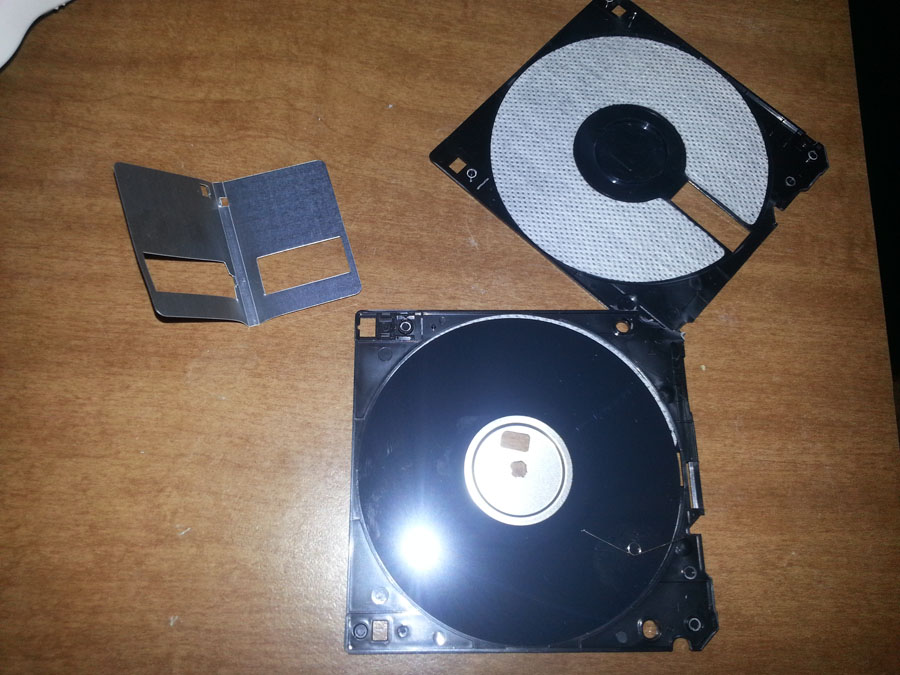
Alright, now time to harvest a good spring. I recommend an old floppy disk.

Remove the sliding silver piece (if yours isn’t silver, don’t panic! Just remove the sliding piece); just start bending it away from the plastic part. Might look like this:

Now bust it open. The best way to do this is to wedge your finger nails between the cracks of the floppy disk and rip it apart. It’s fragile, so it should rip right open without much effort. It’ll look similar to this after you have opened it.
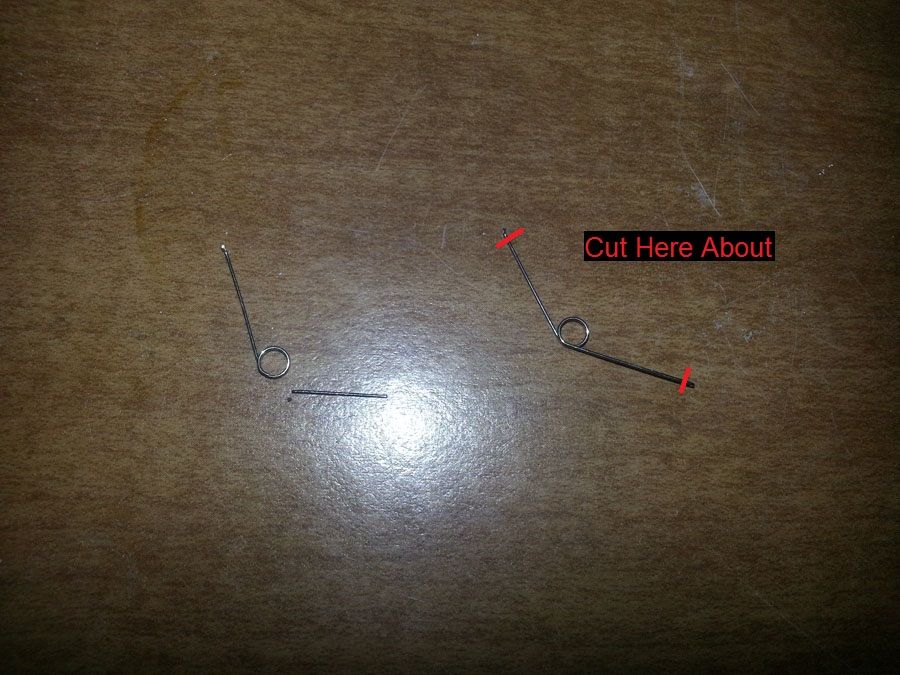
And here is the spring we need.
Look at that, it’s almost perfect. It’s actually bigger than we need, so feel free to cut it down to size with a wire cutter on a pliers or something. I just cut off the tips that jut out to the side. Here’s a picture to show you:
This part requires a lot of patience, because you are reassembling the trigger. You’ll need to get that bar into the trigger, spring, and the controller main body, all while the trigger has to be in a certain position.
The best way to do it is to start by putting the bar through the trigger and the spring. Put it all the way through. Like so:

Now you should be able to snap the bar onto the rest of the controller. Snap it onto these two points here:
When doing this, make sure that the trigger is in an upright position. Best way to do it is to snap in the side without the spring first. Snapping it will take a little effort, but, as always, be careful. Looks something like this:

It’s hard to see in the picture (unlike your finger), but the spring is on the left hand side. The best way to snap on the other side is to position the spring as close to the outside as possible. Make sure the spring is positioned similar to the other trigger. It’s hard for me to take a picture of what it should look like, but you should be able to use the other trigger as reference. Anyways, use the screwdriver to nudge the spring over to the outside wall of the trigger. Then snap it on. Should look like this:
The trigger should feel like the other trigger now. Move it around a little bit to test it.
Let’s put the trigger “H” pieces back on, as well as the R1 and L1 buttons. Put the buttons on first. If you are having troubles, move the trigger out so the contact pieces for the R1/L1 button moves up a little bit. Line up the button contacts, and the silicon (I assume it is silicon, but maybe it’s rubber) contacts on the controller. Then, slide them down together. After that, put the “H” pieces into place. The legs go down behind the R1/L1 buttons. If you are having trouble with these, pull the trigger back (don’t move the base, just the spring like you are pressing the button in a game) and place the “H” pieces. Should look like this when done:
Test the R1/L1 and R2/L2 buttons to make sure they feel right. If the “1” buttons don’t have a nice “click” feeling to it like they do normally, then that means they are not touching the silicon contacts correctly. Check that out. If the triggers don’t feel right, then the springs aren’t aligned correctly… you’ll basically have to start this guide all over.
If everything checks out, make sure the battery is back in place, and put on the back panel. Start with the top, and fit the back panel onto those “H” pieces. Snap the back of the controller back on, and tighten the screws back into place.
Your controller should now be fully assembled. Triple check the R1/L1 buttons and triggers and make sure everything feels right.
You are done! I hope you enjoyed this guide.
Fantastic ! It works a treat. Thanks so much for your help.
Cheers, I had taken my sons apart today due to the spring having gone. When I looked at the broken spring it kept ringing bells where I had seen one before but I couldn’t recall, once I read your “Floppy Disk Spring” comment it clicked. I had one on my desk that due to boredom had taken apart about two weeks ago. That one had long gone but I still have half a dozen sat in a box gathering dust so apart one came and now the spring is in the controller and works a treat!
Thanks
My issue is the following: My L2 trigger was getting stuck whenever I pressed it, and it was messing with my sanity, so I’d have to pull it back up for it to work, but after doing it for a few times I ended up pulling it out, and all the “H” pieces flied out. I tried putting it back together (it seemed pretty simple at first) but I noticed two major problems, the iron bar is way too small (for some reason) and so is the spring (it’s not broken) and I’m having an IMPOSSIBLE time putting it back together. What are your suggestions? And if you need pictures, how could I provide you with them?
Cheers,
Carlos
Thanks so much you just saved me paying over $5 for 4 replacement springs from ebay which I think is quite exorbitant for what they are and because of your blog here you just made this fix much quicker and cheaper for me so once again thanks heaps mate I think I owe you a beer. ^.^